-
securityA
license-
qualityAn agent-based tool that provides web search and advanced research capabilities including document analysis, image description, and YouTube transcript retrieval.
Last updated -
12
Apache 2.0
Uses Docker to run the Qdrant vector database with persistent storage and auto-restart capabilities, enabling vector search for document retrieval.
Supports GitHub Copilot agent mode in VS Code, allowing Copilot to automate Archive Agent operations through MCP tools for searching and retrieving information from indexed documents.
Offers tested support for Linux Mint, with installation scripts designed to work on this Ubuntu-derived distribution.
Allows interacting with a locally running Ollama instance for AI model processing, specifically configured to use models like llama3.1:8b for query processing and llava:7b-v1.6 for vision capabilities.
Provides integration with OpenAI's API for high-performance AI processing, using OpenAI's models for embedding, chunking, and querying operations on indexed documents.
Leverages Python environments for runtime operations, with specific version requirements (>= 3.10) and integration with Python packages for processing documents and images.
Integrates with spaCy's tokenizer model for advanced text processing and semantic chunking with context headers when processing documents.
Provides tested support for Ubuntu 24.04, with installation scripts specifically designed for Ubuntu-derived Linux distributions including Linux Mint.

An intelligent file indexer with powerful AI search (RAG engine), automatic OCR, and a seamless MCP interface.
Archive Agent brings RAG to your command line and connects to your tools via MCP — it's not a chatbot.
¹ Retrieval Augmented Generation is the method of matching pre-made snippets of information to a query.
~/Documents/*.pdf ¹ Includes xAI / Grok and Claude OpenAI compatible APIs.
Simply adjust the URL settings and overwrite OPENAI_API_KEY.
(If you can't see the diagram below, view it on Mermaid.live)
Archive Agent has been tested with these configurations:
If you've successfully installed and tested Archive Agent with a different setup, please let me know and I'll add it here!
Please install these requirements before proceeding:
This installation method should work on any Linux distribution derived from Ubuntu (e.g. Linux Mint).
To install Archive Agent in the current directory of your choice, run this once:
The install.sh script will execute the following steps:
uv (used for Python environment management)spaCy model for natural language processing (pre-chunking)pandoc (used for document parsing)archive-agent command for the current userArchive Agent is now installed!
👉 Please complete the AI provider setup next.
(Afterward, you'll be ready to Run Archive Agent!)
Archive Agent lets you choose between different AI providers:
💡 Good to know: You will be prompted to choose an AI provider at startup; see: Run Archive Agent.
📌 Note: You can customize the specific models used by the AI provider in the Archive Agent settings. However, you cannot change the AI provider of an existing profile, as the embeddings will be incompatible; to choose a different AI provider, create a new profile instead.
If the OpenAI provider is selected, Archive Agent requires the OpenAI API key.
To export your OpenAI API key, replace sk-... with your actual key and run this once:
This will persist the export for the current user.
💡 Good to know: OpenAI won't use your data for training.
If the Ollama provider is selected, Archive Agent requires Ollama running at http://localhost:11434.
With the default Archive Agent Settings, these Ollama models are expected to be installed:
💡 Good to know: Ollama also works without a GPU. At least 32 GiB RAM is recommended for smooth performance.
If the LM Studio provider is selected, Archive Agent requires LM Studio running at http://localhost:1234.
With the default Archive Agent Settings, these LM Studio models are expected to be installed:
💡 Good to know: LM Studio also works without a GPU. At least 32 GiB RAM is recommended for smooth performance.
Archive Agent currently supports these file types:
.txt, .md, .markdown.html, .htm (images not supported).odt, .docx (including images).pdf (including images; see OCR strategies).jpg, .jpeg, .png, .gif, .webp, .bmp📌 Note: Images in HTML documents are currently not supported.
📌 Note: Legacy .doc files are currently not supported.
📌 Note: Unsupported files are tracked but not processed.
Ultimately, Archive Agent decodes everything to text like this:
See Archive Agent settings: image_ocr, image_entity_extract
Archive Agent processes files with optimized performance:
See Archive Agent settings: max_workers_ingest, max_workers_vision, max_workers_embed
For PDF documents, there are different OCR strategies supported by Archive Agent:
strict OCR strategy (recommended):relaxed OCR strategy:auto OCR strategy:ocr_auto_threshold, the minimum number of characters for auto OCR strategy to resolve to relaxed instead of strict.⚠️ Warning: The auto OCR strategy is still experimental.
PDF documents often contain small/scattered images related to page style/layout which cause overhead while contributing little information or even cluttering the result.
💡 Good to know: You will be prompted to choose an OCR strategy at startup (see Run Archive Agent).
Archive Agent processes decoded text like this:
See Archive Agent settings: chunk_lines_block, chunk_words_target
💡 Good to know: This smart chunking improves the accuracy and effectiveness of the retrieval.
📌 Note: Splitting into sentences may take some time for huge documents. There is currently no possibility to show the progress of this step.
To ensure that every chunk can be traced back to its origin, Archive Agent maps the text contents of each chunk to the corresponding line numbers or page numbers of the source file.
.txt) use the range of line numbers as reference..pdf) use the range of page numbers as reference.📌 Note: References are only approximate due to paragraph/sentence splitting/joining in the chunking process.
Archive Agent retrieves chunks related to your question like this:
See Archive Agent settings: retrieve_score_min, retrieve_chunks_max
Archive Agent filters the retrieved chunks .
See Archive Agent settings: rerank_chunks_max, expand_chunks_radius
Archive Agent answers your question using the reranked and expanded chunks like this:
💡 Good to know: Archive Agent uses an answer template that aims to be universally helpful.
Archive Agent uses patterns to select your files:
/home/user/Documents/*.txt (or ~/Documents/*.txt).* to match any file in the given directory.** to match any files and zero or more directories, subdirectories, and symbolic links to directories.There are included patterns and excluded patterns:
This approach gives you the best control over the specific files or file types to track.
💡 Good to know: At startup, you will be prompted to choose the following:
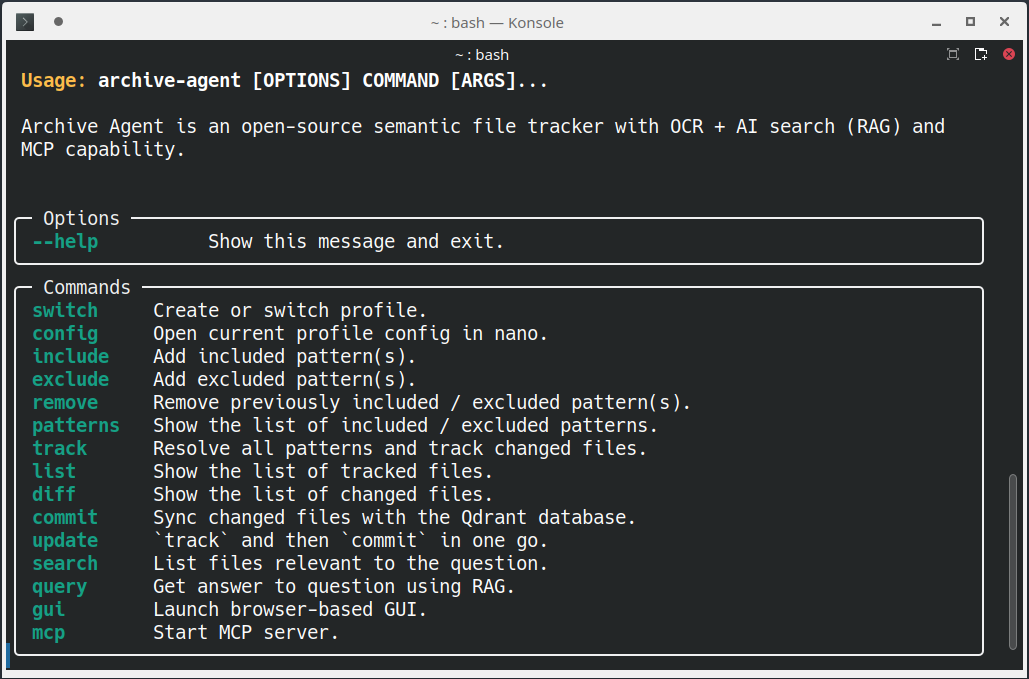
Screenshot of command-line interface (CLI):
For example, to track your documents and images, run this:
To start the GUI, run this:
Or, to ask questions from the command line:
To see the list of supported commands, run this:
To switch to a new or existing profile, run this:
📌 Note: Always use quotes for the profile name argument, or skip it to get an interactive prompt.
💡 Good to know: Profiles are useful to manage independent Qdrant collections (see Qdrant database) and Archive Agent settings.
To open the current profile's config (JSON) in the nano editor, run this:
See Archive Agent settings for details.
To add one or more included patterns, run this:
📌 Note: Always use quotes for the pattern argument (to prevent your shell's wildcard expansion), or skip it to get an interactive prompt.
To add one or more excluded patterns, run this:
📌 Note: Always use quotes for the pattern argument (to prevent your shell's wildcard expansion), or skip it to get an interactive prompt.
To remove one or more previously included / excluded patterns, run this:
📌 Note: Always use quotes for the pattern argument (to prevent your shell's wildcard expansion), or skip it to get an interactive prompt.
To see the list of included / excluded patterns, run this:
To resolve all patterns and track changes to your files, run this:
To see the list of tracked files, run this:
📌 Note: Don't forget to track your files first.
To see the list of changed files, run this:
📌 Note: Don't forget to track your files first.
To sync changes to your files with the Qdrant database, run this:
To see additional information (vision, chunking, embedding), pass the --verbose option.
To bypass the AI cache (vision, chunking, embedding) for this commit, pass the --nocache option.
💡 Good to know: Changes are triggered by:
The Qdrant database is updated after all files have been ingested.
📌 Note: Don't forget to track your files first.
To track and then commit in one go, run this:
To see additional information (vision, chunking, embedding), pass the --verbose option.
To bypass the AI cache (vision, chunking, embedding) for this commit, pass the --nocache option.
Lists files relevant to the question.
📌 Note: Always use quotes for the question argument, or skip it to get an interactive prompt.
To see additional information (embedding, retrieval, reranking), pass the --verbose option.
To bypass the AI cache (embedding, reranking) for this search, pass the --nocache option.
Answers your question using RAG.
📌 Note: Always use quotes for the question argument, or skip it to get an interactive prompt.
To see additional information (embedding, retrieval, reranking, querying), pass the --verbose option.
To bypass the AI cache (embedding, reranking) for this query, pass the --nocache option.
To save the query results to a JSON file, use either:
--to-json with a specific filename:--to-json-auto to auto-generate a clean filename from the question (max 160 chars, truncated with [...] if needed):💡 Good to know: The JSON output follows the QuerySchema format defined in AiQuery.py.
To launch the Archive Agent GUI in your browser, run this:
To see additional information (embedding, retrieval, reranking, querying), pass the --verbose option.
To bypass the AI cache (embedding, reranking) for this query, pass the --nocache option.
📌 Note: Press CTRL+C in the console to close the GUI server.
To start the Archive Agent MCP server, run this:
To see additional information (embedding, retrieval, reranking, querying), pass the --verbose option.
To bypass the AI cache (embedding, reranking) for this query, pass the --nocache option.
📌 Note: Press CTRL+C in the console to close the MCP server.
💡 Good to know: Use these MCP configurations to let your IDE or AI extension automate Archive Agent:
.vscode/mcp.json for GitHub Copilot agent mode (VS Code): .roo/mcp.json for Roo Code (VS Code extension)Archive Agent exposes these tools via MCP:
| MCP tool | Equivalent CLI command(s) | Argument(s) | Implementation | Description |
|---|---|---|---|---|
get_patterns | patterns | None | Synchronous | Get the list of included / excluded patterns. |
get_files_tracked | track and then list | None | Synchronous | Get the list of tracked files. |
get_files_changed | track and then diff | None | Synchronous | Get the list of changed files. |
get_search_result | search | question | Asynchronous | Get the list of files relevant to the question. |
get_answer_rag | query | question | Asynchronous | Get answer to question using RAG. |
📌 Note: These commands are read-only, preventing the AI from changing your Qdrant database.
💡 Good to know: Just type #get_answer_rag (e.g.) in your IDE or AI extension to call the tool directly.
💡 Good to know: The #get_answer_rag output follows the QuerySchema format defined in AiQuery.py.
This step is not immediately needed if you just installed Archive Agent. However, to get the latest features, you should update your installation regularly.
To update your Archive Agent installation, run this in the installation directory:
📌 Note: If updating doesn't work, try removing the installation directory and then Install Archive Agent again. Your config and data are safely stored in another place; see Archive Agent settings and Qdrant database for details.
💡 Good to know: To also update the Qdrant docker image, run this:
Archive Agent settings are organized as profile folders in ~/.archive-agent-settings/.
E.g., the default profile is located in ~/.archive-agent-settings/default/.
The currently used profile is stored in ~/.archive-agent-settings/profile.json.
📌 Note: To delete a profile, simply delete the profile folder. This will not delete the Qdrant collection (see Qdrant database).
The profile configuration is contained in the profile folder as config.json.
💡 Good to know: Use the config CLI command to open the current profile's config (JSON) in the nano editor (see Open current profile config in nano).
💡 Good to know: Use the switch CLI command to switch to a new or existing profile (see Create or switch profile).
| Key | Description |
|---|---|
config_version | Config version |
mcp_server_host | MCP server host (default http://127.0.0.1; set to http://0.0.0.0 to expose in LAN) |
mcp_server_port | MCP server port (default 8008) |
ocr_strategy | OCR strategy in DecoderSettings.py |
ocr_auto_threshold | Minimum number of characters for auto OCR strategy to resolve to relaxed instead of strict |
image_ocr | Image handling: true enables OCR, false disables it. |
image_entity_extract | Image handling: true enables entity extraction, false disables it. |
chunk_lines_block | Number of lines per block for chunking |
chunk_words_target | Target number of words per chunk |
qdrant_server_url | URL of the Qdrant server |
qdrant_collection | Name of the Qdrant collection |
retrieve_score_min | Minimum similarity score of retrieved chunks (0...1) |
retrieve_chunks_max | Maximum number of retrieved chunks |
rerank_chunks_max | Number of top chunks to keep after reranking |
expand_chunks_radius | Number of preceding and following chunks to prepend and append to each reranked chunk |
max_workers_ingest | Maximum number of files to process in parallel, creating one thread for each file |
max_workers_vision | Maxmimum number of parallel vision requests per file, creating one thread per request |
max_workers_embed | Maxmimum number of parallel embedding requests per file, creating one thread per request |
ai_provider | AI provider in ai_provider_registry.py |
ai_server_url | AI server URL |
ai_model_chunk | AI model used for chunking |
ai_model_embed | AI model used for embedding |
ai_model_rerank | AI model used for reranking |
ai_model_query | AI model used for queries |
ai_model_vision | AI model used for vision ("" disables vision) |
ai_vector_size | Vector size of embeddings (used for Qdrant collection) |
ai_temperature_query | Temperature of the query model |
📌 Note: Since max_workers_vision and max_workers_embed requests are processed in parallel per file,
and max_workers_ingest files are processed in parallel, the total number of requests multiplies quickly.
Adjust according to your system resources and in alignment with your AI provider's rate limits.
The profile watchlist is contained in the profile folder as watchlist.json.
The watchlist is managed by these commands only:
include / exclude / removetrack / commit / updateEach profile folder also contains an ai_cache folder.
The AI cache ensures that, in a given profile:
This way, Archive Agent can quickly resume where it left off if a commit was interrupted.
To bypass the AI cache for a single commit, pass the --nocache option to the commit or update command
(see Commit changed files to database and Combined track and commit).
💡 Good to know: Queries are never cached, so you always get a fresh answer.
📌 Note: To clear the entire AI cache, simply delete the profile's cache folder.
📌 Technical Note: Archive Agent keys the cache using a composite hash made from the text/image bytes, and of the AI model names for chunking, embedding, reranking, and vision. Cache keys are deterministic and change generated whenever you change the chunking, embedding or vision AI model names. Since cache entries are retained forever, switching back to a prior combination of AI model names will again access the "old" keys.
The Qdrant database is stored in ~/.archive-agent-qdrant-storage/.
📌 Note: This folder is created by the Qdrant Docker image running as root.
💡 Good to know: Visit your Qdrant dashboard to manage collections and snapshots.
Archive Agent was written from scratch for educational purposes (on either end of the software).
💡 Good to know: Tracking the test_data/ gets you started with some kind of test data.
To get started, check out these epic modules:
archive_agent/data/FileData.pyarchive_agent/core/ContextManager.pyarchive_agent/config/ConfigManager.py archive_agent/__main__.pyarchive_agent/core/CommitManager.pyarchive_agent/util/CliManager.pyarchive_agent/core/GuiManager.pyarchive_agent/ai/AiManager.py archive_agent/ai_provider/ai_provider_registry.pyIf you miss something or spot bad patterns, feel free to contribute and refactor!
Archive Agent implements comprehensive retry logic with exponential backoff to handle transient failures:
This robust retry system ensures reliable operation even with unstable network conditions or intermittent service issues.
To run unit tests, check types, and check style, run this:
To run Qdrant with in-memory storage (e.g., in OpenAI Codex environment where Docker is not available),
export this environment variable before running install.sh and archive-agent:
install.sh to skip manage-qdrant.sh.QdrantManager.py to ignore server URL and use in-memory storage instead.📌 Note: Qdrant in-memory storage is volatile (not persisted to disk).
To bulk-rename file paths in chunk metadata in the currently active Qdrant collection, run this:
Useful after moving files or renaming folders when you don't want to run the update command again.
📌 Note:
Archive Agent < v11.0.0 included file paths in the chunk context headers; this was a bad design decision that led to skewed retrieval.
To bulk-remove all file paths in context headers in the currently active Qdrant collection, run this:
📌 Note:
track initially reports a file as added, subsequent track calls report it as changed. {size=0, mtime=0, diff=removed}.{size=X, mtime=Y, diff=added}.size and mtime were cleared, we lost the information to detect a restored file.strict OCR strategy would certainly help in the meantime.) .docx) are not supported yet; Microsoft Word document support is experimental.AiResult schema migration yet. (If you encounter errors, passing the --nocache flag or deleting all AI cache folders would certainly help in the meantime.)strict OCR mode are currently left empty instead of resorting to text extracted from PDF OCR layer (if any).en_core_web_md used for sentence splitting is only suitable for English source text. Multilingual support is missing at the moment.[Unprocessable image].Copyright © 2025 Dr.-Ing. Paul Wilhelm <paul@wilhelm.dev>
See LICENSE for details.
You are invited to contribute to this open source project! Feel free to file issues and submit pull requests anytime.
This server cannot be installed
hybrid server
The server is able to function both locally and remotely, depending on the configuration or use case.
Archive Agent is an open-source semantic file tracker with OCR + AI search (RAG) and MCP capability.
We provide all the information about MCP servers via our MCP API.
curl -X GET 'https://glama.ai/api/mcp/v1/servers/shredEngineer/Archive-Agent'
If you have feedback or need assistance with the MCP directory API, please join our Discord server